- ORDERS PLACED TODAY WILL BE SHIPPED ON MAY 1ST
It’s a beautiful time of the year when all you see around are cute bunnies and lots of Easter eggs. Kids are the ones that fully enjoy this period for sure. We all love spending time with the family, so why not turn it into quality time doing activities together like decorating the house for Easter? There are different ways you can make this Easter special and funny for all the family. Some of us prefer to go to a store and buy ready-made decorations, but there is a better way of enjoying Easter especially when everything is made at home. There are thousands of easter crafts and crafty ideas everyone can use and make their Easter special. We are bringing some ideas for preschoolers and kindergarteners to enjoy along with some challenging ideas for older kids. All the ideas we have selected are easy to make so let’s start.
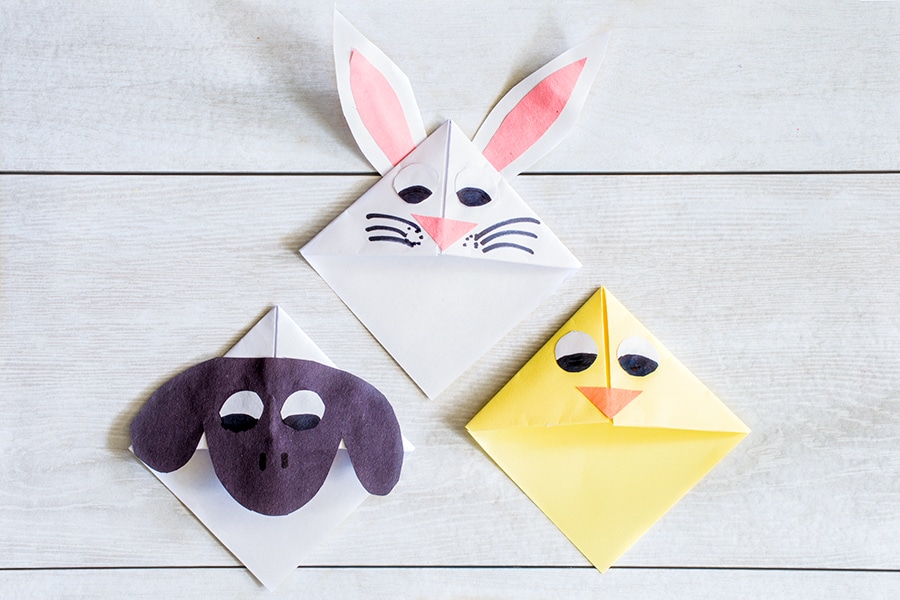
Origami Corner Bookmark
These are some cute and very simple bookmarks. The kids will love making them. They are very practical and you can use them everywhere even as an Easter basket filler. Create all these wonderful crafts on your own or together with your kids at home and engage them in some recreational activities.
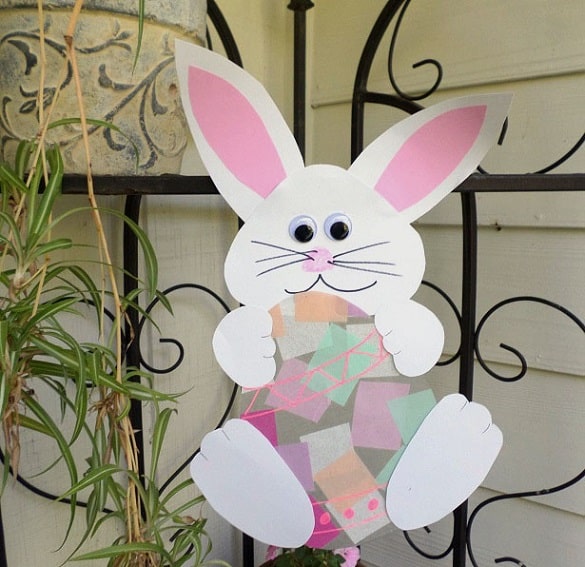
Image by Crafter Morning
Paper Bunny
Materials:
- Contact paper
- Tissue paper
- Googly eyes
- Black and colored sharpies
- Scissors/Glue
- White and pink card stock paper
This craft is perfect for younger kids because it is a little bit easier than the first one. Firstly, you need to draw the body parts of the bunny. Afterwards cut them out one by one. Make sure to use different papers to give a little more colours to the bunny. After you have all the body parts it is time to assemble all of them using glue. Once all together let the glue dry and your bunny is ready. Use some chalk markers to help your kids add some details to the bunny and it will be super cute.
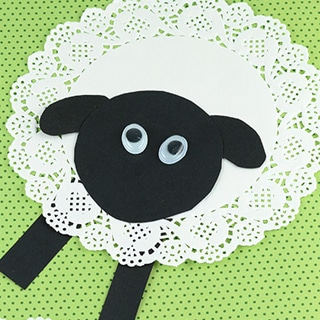
Doily sheep
Materials:
- Paper doilies
- Glue
- Scissors
- Googly eyes
- Sheet of black paper
Let’s start with the easiest part of this craft. Take the sheet of black paper and cut two straight strips that will be used to make the legs of the sheep. You will then cut one round shape for the head and two more oval shapes that will be used as the ears. Firstly, glue the two straight strips to the back of the doily. Then take the two oval shapes and glue them on the back of the round shape. Put the two googly eyes on the head of the sheep and after preparing it all glue the head of the sheep to the doily. This is just one of the infinite crafts you can do using the dollies.
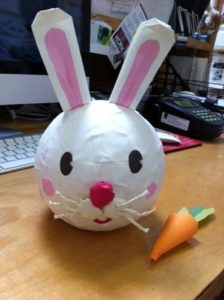
Papier Mache Bunnies
All you need to create something as cute as a wobbling papier mache bunny are some materials you all can easily get your hands on:
- Paper
- Store-bought or homemade mod podge
- Easter paint
- Scissors
- Cardstock with Easter colours
- Some water balloons or even regular ones for making big bunnies
- Brush
- Chalk markers
- Black marker
- Something to fill the balloons like rice or beans.
We will start by tearing the paper into some small strips. Afterwards, take some rice or beans and place them into the balloons. Just put enough of them to give it a little weight on the bottom. Take the paper’s strips, dip them into the mod podge, and then start to cover the balloon. Make sure to coat the strips with more mod podge after you have attached them to the balloon as they need to be soaked. You will need at least 3 layers of paper to fully cover the balloon properly. Let it all dry for some minutes. After it dries, start with the egg shape painting that will soon become a cute bunny. For the ears use the cardstock to cut them out. At the bottom of each ear, you will need to make a cut into the middle just a little bit so you can add some glue on one half. After you have made the necessary cuts on them push the other half on the top so they can stick together. This way they will have a nice shape. You can add the details on the ears with the help of a permanent black marker and some chalk markers for a nice finish. You can add some pom pom to use as a tail for the bunny.
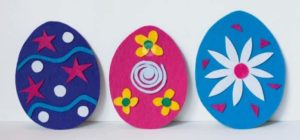
Felt Easter Eggs
You may find some felt Easter eggs at your local craft store during Easter time but you can also make your own. They such a fun way to decorate and craft for Easter.
Materials that you will need for this craft are:
- Buttons
- Felt – you’ll need stiff felt for the Easter egg and any other felt embellishments in hand
- Pom Poms
- Rhinestones
- Ribbon – There are endless options you can use.
Another easy Easter activity for kids is to decorate their own felt Easter eggs. once you set out all of the materials you can let kids create on their own with little or no assistance. Let their imagination unfold. There are various ways to put these crafts to use. You can glue some ribbon to the back and hang these felt eggs on an Easter tree. Furthermore, you can give felt Easter eggs as gifts at Easter or even decorate your placemat settings.
To make felt Easter eggs is very simple and straightforward. Start by cutting out your Easter egg from felt. Trace an egg template on felt and then cut it. You can cut it free handy if you feel confident enough to do that too. The second step is to think about a design and start laying it out. It can be a well-thought design of what you clearly want to represent or a piece after piece decoration as you see fit. Either way, you can start gluing different materials like buttons, pieces of ribbon etc and see what comes out. Lastly, trim any excess ribbon or felt embellishments if you need to.


