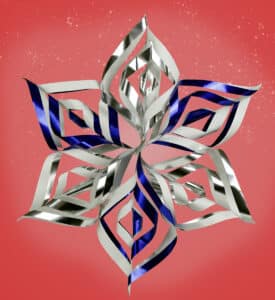
Wonderful for hanging in the classroom, living room or bedroom! These 3D snowflakes are easy and fun to make! You can make them any size, and using 10 x 13 Hygloss Metallic Foil Paper, you can make snowflakes up to 9″ tall!
MATERIALS USED FOR THIS PROJECT:
Tape
STEP ONE:
The first step is to make your first perfect square! This can be any size, as long as it is square. See above we have cut a rectangle piece of Hygloss Foil paper and to make the square shape, we are going to fold one corner down to the bottom to make a 45 degree angle. Score the edge to make the fold and you will have a perfect square based on your triangle angle.
STEP TWO:
Now that you have made your triangle fold (to be a square) cut off the excess paper using scissors. Cut right across where the paper folds.
STEP THREE:
Now take your folded triangle and fold it over once again. Notice above that we are folding along the first fold (at the bottom). Super easy!
STEP FOUR:
This next step is super-important so watch carefully. Cut 4 slits into the double-folded square, making sure to keep the major crease at the top. You can cut pretty far in but be careful not cut so far toward the top that you accidentally cut all the way through.
STEP FIVE:
The next step is super-easy. Just completely unfold the paper to reveal your perfect square with the geometric slits in the middle. It should look something like a kite! If you have followed the prior steps correctly, you should see 5 bands leading from the middle outward.
It is important that you have five! If you don’t, simple refold your square and add another slit to make the fifth band or start over with a new piece of paper.
STEP SIX:
Turn your snowflake over so that the color side of the paper is facing the tabletop. Carefully pull the first band of paper together from behind to make a “rolled up” shape. Put a piece of tape in place to hold those pieces together. You are doing great!
STEP SEVEN:
Carefully pull the third band of paper together from behind to make a “rolled up” shape. Put a piece of tape in place to hold those pieces together.
STEP EIGHT:
Carefully pull the fifth band of paper together from behind to make a “rolled up” shape. Put a piece of tape in place to hold those pieces together. You should now have bands one, three, and five rolled and taped to hold as shown above.
STEP 9:
Turn your paper over. You are almost done with this part of the craft! You should only have two bands left! Carefully take the second band and pull them together hold together with a piece of tape, as shown above.
Take your final band, the fourth band and roll those two sides together and tape them in place!
STEP 10:
Wah-lah! You have your first of six arms done! Follow steps 1-9 again to make your second arm. Attach the first two arms together with tape as shown above!
STEP 11:
Once you have all six “arms” of your 3D snowflake made, connect them all using tape to hold them together! You did great! Hang with pride and be sure to try making snowflakes with 2 or more colors (a different color for each arm for variety!)
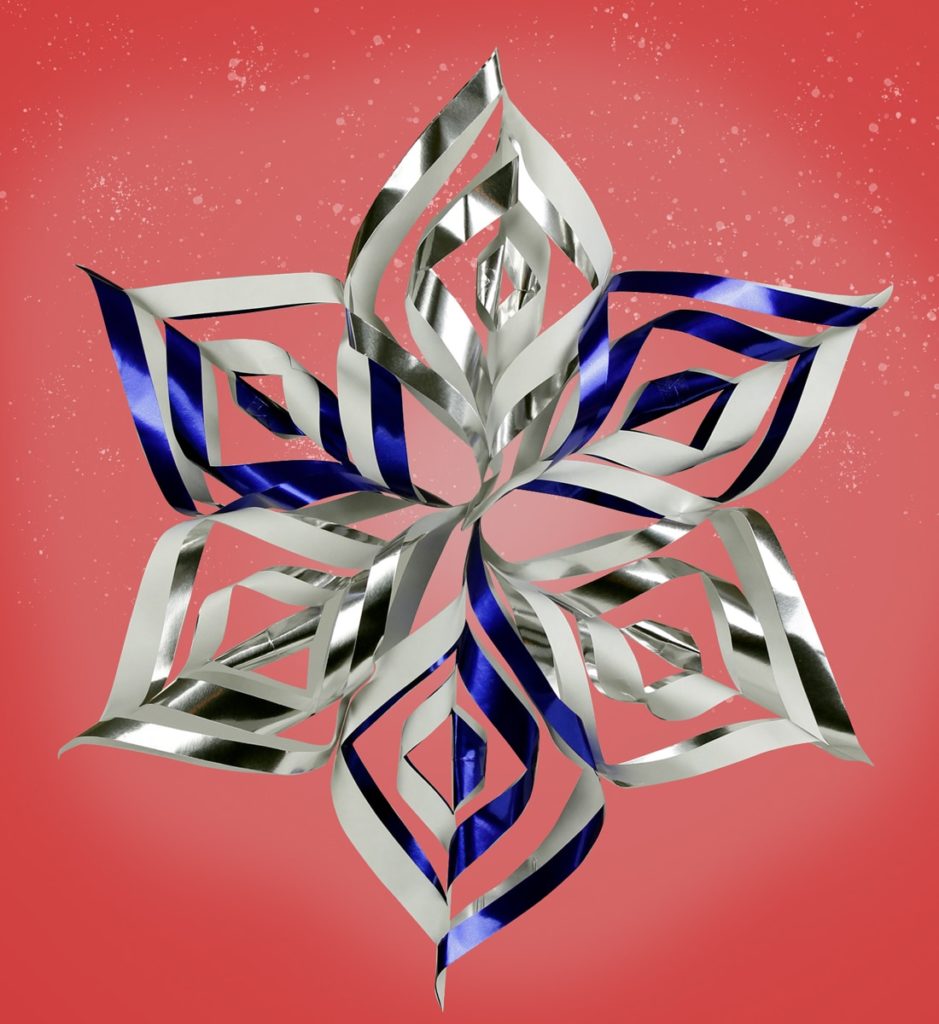
Winter is a time of retreat and reflection but also a time for appreciating the change of seasons and celebrating the cold and snow in a warm spirit!


